

How to Wrap a Present
Wrapping presents is an art form, to say the least. Sitting under the tree, beautifully-wrapped presents add to the anticipation of the e paper-shred frenzy that is Christmas Day. A well-wrapped present, though short-lived, can be the icing on the cake to top off your amazing gift (or the flashy façade of your mediocre gift).
Much like origami, gift-wrapping involves paper-folding skills, great attention to detail and sheer determination. Originating in Ancient China in the 2nd century BC and popularized by the Hall brothers (founders of Hallmark Cards), the act of wrapping decorative paper around gifts has become a staple skill during the holidays. Nowadays, according to The Atlantic, Americans spend over $2.6 billion on about 85 million tons of wrapping paper each year. . To put it simply, gift-wrapping is certainly no joke.
This holiday season, instead of going to Barnes and Noble, the mall or your mom to get your gifts unoriginally wrapped, impress your loved ones with these innovative and easy gift-wrapping ideas that even a non-DIYer can achieve.
Materials:
- Wrapping paper of your choice
- Bows/ribbon
- Scissors
- Tape
- Optional: Ruler, pencil
Tips to Know Beforehand:
- Try to use the least amount of tape possible. Too much tape draws away from the presentation.
- Be as tight as possible when folding the paper to avoid air bubbles.
- It’s better to overestimate the amount of wrapping paper needed. You can always cut out excess while wrapping.
The Classic
In order to master the art of gift-wrapping, you must first learn the simplest and easiest shape—the classic box.
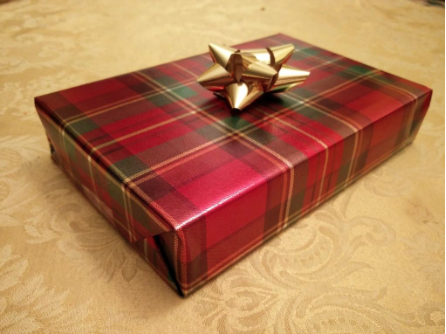
The Classic style, wrapped by Annie Uichanco ‘16
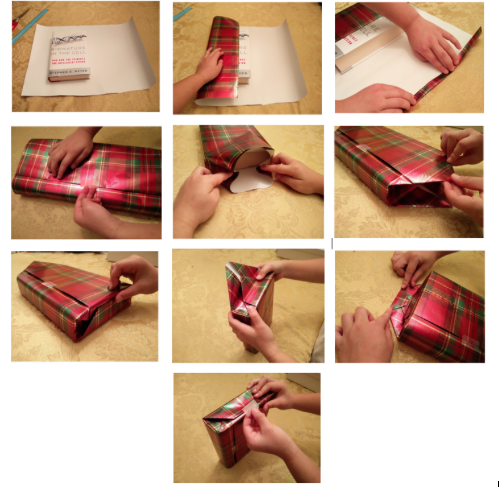
A step-by-step diagram for the Classic wrapping style.
Directions:
- Find a rectangular prismatic object (a book, box, etc.). Measure and cut out the correct dimensions of the wrapping paper, and lay flat on a table. Place the object in the center.
- Fold the paper over the top and hold in place with one hand.
- With the other hand, bring the other side of the wrapping paper over to form an overlap, like a burrito. (To give a neater appearance, fold the edges to make a straight line if your cutting was messy). Tape as tight as possible.
- Choose one side to start with. Synch the sides in and fold until two triangles form.
- Fold the one triangle over the other. If the triangle on top is too long, you can fold over or cut to perfection.
- Repeat this process for the other side.
- Decorate to your standards.
Rudolph
This style can be applied to any small, round and flat object. More creative than the Classic, it makes a great presentation for your “deer” friend.
Rudolph style, wrapped by Annie Uichanco ‘16.
A step-by-step diagram of the Rudolph wrapping style.
Directions:
- Find a small, flat and round object (a clock, plate, etc.). Measure out and cut a square with the correct dimensions of wrapping paper. Lay flat on the table.
- Like a burrito, fold one side of the wrapping paper over the other across the diameter of your round object.
- Then, like the Classic, choose one open end. Synch the sides together until two triangles form. Fold one triangle over the other. Cut excess wrapping paper to exactitude.
- Repeat on the other open end.
- Now, you can add two candy canes for the antlers and a red bow for the nose.
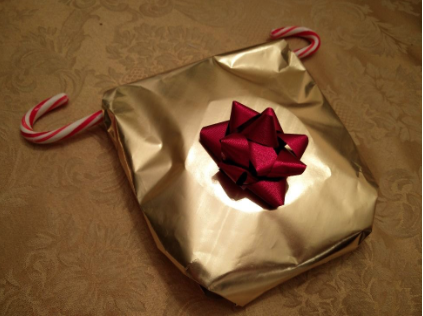
Christmas Candy
Why not sweeten up your loved one’s life with this interesting, confectionery wrapping style?
Directions:
- Find a small, flat and round object (a clock, plate, etc.). Measure out and cut a square with the correct dimensions of wrapping paper. Lay flat on the table.
- Like a burrito, fold one side of the wrapping paper over the other across the diameter of your round object.
- Then, like the Classic, choose one open end. Synch the sides together until two triangles form. Fold one triangle over the other. Cut excess wrapping paper to exactitude.
- Repeat on the other open end.
- Now, you can add two candy canes for the antlers and a red bow for the nose.

The Christmas Candy style, wrapped by Annie Uichanco ‘16.
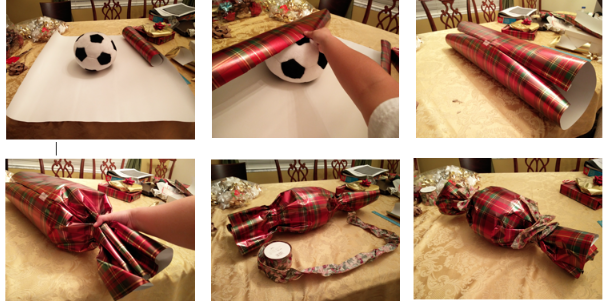
A step-by-step diagram of the Christmas Candy wrapping style.
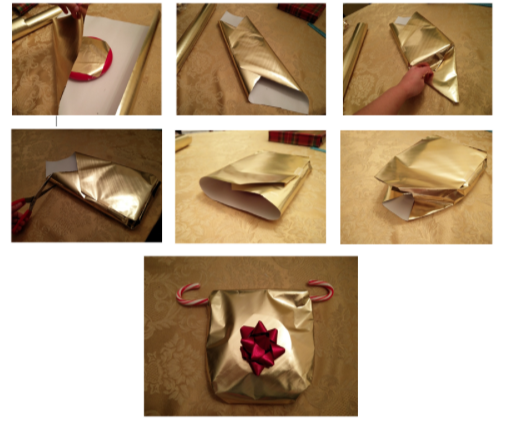
Directions:
- Start off with a round object of any size. Measure and cut out the correct dimensions needed to surround the object completely.
- Again, like a burrito, wrap the object in between two sides of the paper. Tape.
- Grab the two open ends and crinkle until they form a nice candy shape. Do not crinkle or twist too tightly, as the paper may rip.
- Take a piece of ribbon of your choice. Cut two lengths of your ribbon for wrapping around the ends.
- Make sure to cut just enough ribbon to be able to tie a bow.
Christmas Tree
This style is great for any pyramidal or bizarre shapes, when no boxes are to be found around the house. Although it may seem sappy, it’s guaranteed to spruce up your tree skirt “fir” sure.
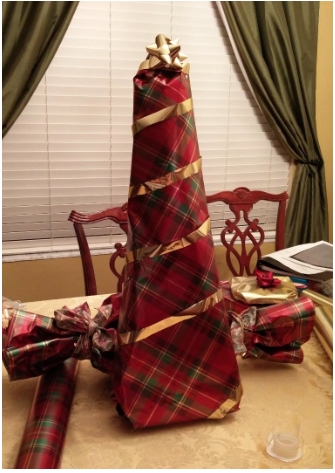
The Christmas Tree style, wrapped by Annie Uichanco ‘16.
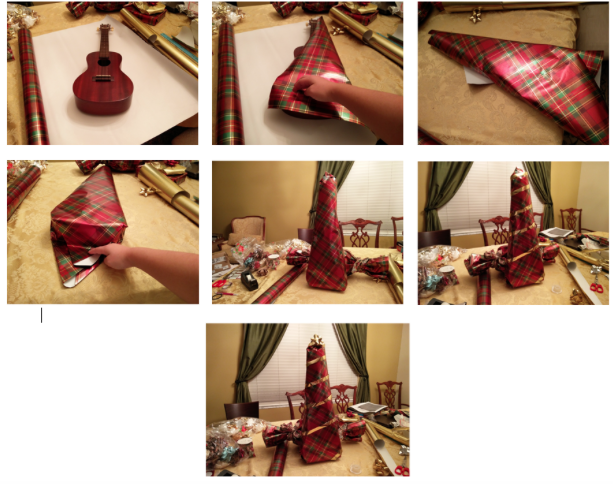
A step-by-step diagram of the Christmas Tree wrapping style.
Directions:
- Start off with a remotely pyramidal or bizarrely-shaped object. I chose a ukulele. Measure and cut the correct dimensions for your Christmas tree. (You will probably need a lot of wrapping paper for this one.) Place the object diagonally on the paper.
- Instead of making a burrito, wrap two opposite corners inward, while twisting them upward, thus forming a cone around the object. Tape.
- Take the larger opening. Synch and fold two sides until two triangles form. Fold one triangle over the other. Cut any excess paper with precision.
- After you’ve folded the base of your Christmas tree, try to balance it. Then, focusing on the top of your Christmas tree, repeat the process. (For the top, try to make it as pointy as possible).
- Decorate your Christmas tree to your liking.
If you’ve mastered these gift-wrapping hacks, I encourage you to take a step back and admire your work. However, it’s important to remember that the greatest gift of all—that doesn’t require wrapping paper or expert craftsmanship—is your presence. Make sure to wrap your presence with love, happiness and Christmas joy as you embark on this holiday season.
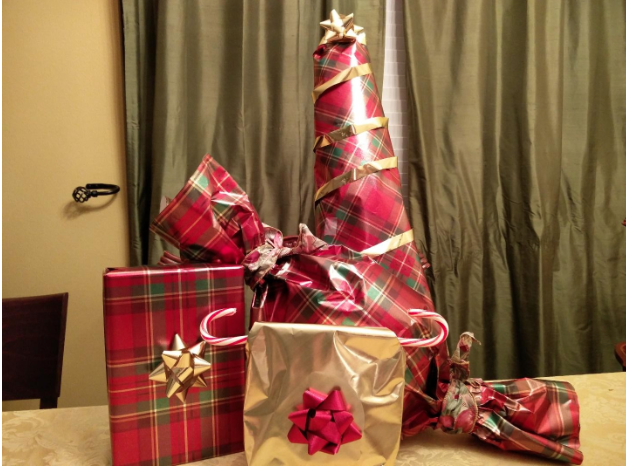
The Classic, Rudolph, Christmas Candy, and Christmas Tree wrapping styles–Happy Holidays!
Chloe • Dec 15, 2015 at 10:53 pm
This is super helpful!!! Thanks for the ideas! 😀